关于flex的内容不说太多,网上太多,再次只记录如何使用了
只要用flex布局的,添加一下内容
1 | /*设置body为伸缩容器*/ |
只要用flex布局的,添加一下内容
1 | /*设置body为伸缩容器*/ |
Examples
[] is equal ![]
Array is equal not array:
[] == ![]; // -> true ( What The f*ck Javascript )
💡 Explanation:
The abstract equality operator converts both sides to numbers to compare them, and both sides become the number 0 for different reasons. Arrays are truthy, so on the right, the opposite of a truthy value is false, which is then coerced to 0. On the left, however, an empty array is coerced to a number without becoming a boolean first, and empty arrays are coerced to 0, despite being truthy.
Here is how this expression simplifies:
+[] == +![];
0 == +false;
0 == 0;
true;
See also [] is truthy, but not true.
前端路由的实现方式
前端路由主要由两种方式实现:
location.hash+hashchange事件
history.pushState()+popState事件
这种方法的好处在于支持IE浏览器。对早期的一些浏览器的支持比较好。
实现原理:
location.hash始终指向页面url 中#之后的内容
当当前页面的url =www.baidu.com,可以在浏览器的控制台输入location.hash为空,
当页面指向url =www.baidu.com/#/hello的时候,location.hash = #/hello。通过读取location.hash可以知道当前页面所处的位置。通过hashchange事件可以监听location.hash的变化,从而进行相应的处理即可。
那么如何触发hash的改变呢?这里主要由两种方法:
设置a标签,href =’#/blue’,当点击标签的时候,可以在当前url的后面增加上’#/blue’,同时触发hashchange,再回调函数中进行处理。
直接在js中对location.hash ='#/blue'即可,此时url会改变,也会触发hashchange事件。
下面给出一个通用的hash前端路由的实现方案:
方法一:
双层循环,外层循环元素,内层循环时比较值
如果有相同的值则跳过,不相同则push进数组
Array.prototype.distinct = function() {
    var arr = this,
        result = [],
        i,
        j,
        len = arr.length;
    for (i = 0; i < len; i++) {
        for (j = i + 1; j < len; j++) {
            if (arr[i] === arr[j]) {
                j = ++i;
            }
        }
        result.push(arr[i]);
    }
    return result;
}
var arra = [1, 2, 3, 4, 4, 1, 1, 2, 1, 1, 1];
arra.distinct(); //返回[3,4,2,1]
引用网上的一张图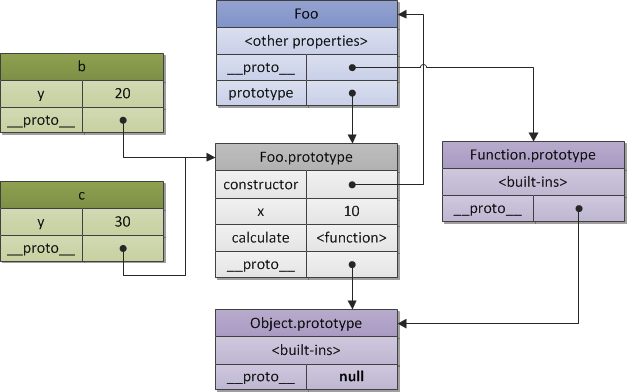
简单概括就四句话
1.实例的proto === 构造函数的prototype
2.构造函数的proto === Function.prototye
3.构造函数原型(Array.prototype)的proto === Object.prototype(对象的原型)
4.Object.prototype.proto === null;
1 | <html> |
原文地址:js中的事件委托或是事件代理详解
它还有一个名字叫事件代理,JavaScript高级程序设计上讲:事件委托就是利用事件冒泡,只指定一个事件处理程序,就可以管理某一类型的所有事件。那这是什么意思呢?网上的各位大牛们讲事件委托基本上都用了同一个例子,就是取快递来解释这个现象,我仔细揣摩了一下,这个例子还真是恰当,我就不去想别的例子来解释了,借花献佛,我摘过来,大家认真领会一下事件委托到底是一个什么原理:
有三个同事预计会在周一收到快递。为签收快递,有两种办法:一是三个人在公司门口等快递;二是委托给前台MM代为签收。现实当中,我们大都采用委托的方案(公司也不会容忍那么多员工站在门口就为了等快递)。前台MM收到快递后,她会判断收件人是谁,然后按照收件人的要求签收,甚至代为付款。这种方案还有一个优势,那就是即使公司里来了新员工(不管多少),前台MM也会在收到寄给新员工的快递后核实并代为签收。
async 函数是什么?一句话,它就是 Generator 函数的语法糖。
const gen = function* () {
  const f1 = yield readFile('/etc/fstab');
  const f2 = yield readFile('/etc/shells');
  console.log(f1.toString());
  console.log(f2.toString());
};
写成async函数,就是下面这样。
const asyncReadFile = async function () {
  const f1 = await readFile('/etc/fstab');
  const f2 = await readFile('/etc/shells');
  console.log(f1.toString());
  console.log(f2.toString());
};
JavaScript 语言中,生成实例对象的传统方法是通过构造函数。下面是一个例子。
function Point(x, y) {
  this.x = x;
  this.y = y;
}

Point.prototype.toString = function () {
  return '(' + this.x + ', ' + this.y + ')';
};

var p = new Point(1, 2);
1.对于Javascript 1.8.5(ECMAScript 5),变量名字.isArray( )可以实现这个目的
var a=[];
var b={};
Array.isArray(a);//true
Array.isArray(b)//false
* 一、新增标签
** 结构标签
相当于有意义的div标签
article:用于定义一篇文章
header:定义页面的头部
footer:
nav:导航条链接
section:定义一个区域
aside:定义页面内容的侧边栏
hgroup:定义文件中一个区块的相关信息
figure:定义一组媒体内容以及它们的标题(可以用于包裹canvas,video等多媒体标签)
figcaption:用于figure标签内定义媒体的标题
footer:定义一个页面区域的底部
dialog:定义一个对话框(例如微信的对话框)
补充一:header/section/footer/aside/article/footer这几个标签最好不要嵌套在里面,放在最外边
补充二:使用层级(header=section=footer:写在外层)>(aside/article/figure/hgroup/nav:写在内层)
持续更新… 未完待续…
1.Fetch https://developer.mozilla.org/zh-CN/docs/Web/API/Fetch_API/Using_Fetch
http://taobaofed.org/blog/2016/03/09/server-in-front-end/
<!-- fetchApi.js -->
eg:import { baseURL } from 'config/GlobalConfig';
    let fetchApi = (url, type, params) => {
        return fetch(`${baseURL + url}`, {method: type, body: JSON.stringify(params)}).then(
            response => response.json()
        ).catch(error => console.error('Error:', error));
    };
    export default fetchApi;
<!-- html -->
引用: import fetchApi from 'fetchApi.js';
fetchApi('url', 'get/post/put/delete…', params).then((r) => {
    console.log(r)
})